ลำดับตอนที่ #400
คืนค่าการตั้งค่าทั้งหมด
คุณแน่ใจว่าต้องการคืนค่าการตั้งค่าทั้งหมด ?
ลำดับตอนที่ #400 : [How to specialty] :: Valentine's Day Ideas [eng ver.]
เป็นอะไรที่สวยมากเลย แต่โหดมากๆๆ - -
ENG VER.
Learn in this tutorial how to create a vector Valentine's heart with additional effects and textures.
Begin by representing a new file (File>New) that must have 1024x768 px and 72 dpi. Use next the Rectangle Tool (U) to draw the background of our picture we want to get finally.

Select the next demonstrated parameters by making a mouse click on the layer we work with on the layers’ panel. Fill 0%
Blending Options>Gradient Overlay
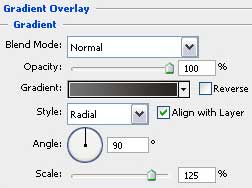
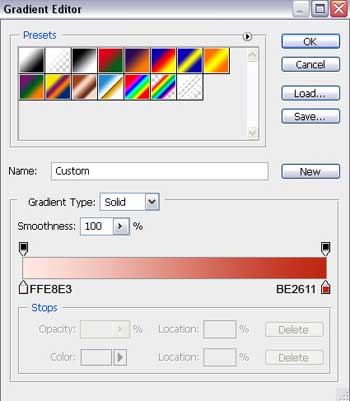
Gradient’s parameters:


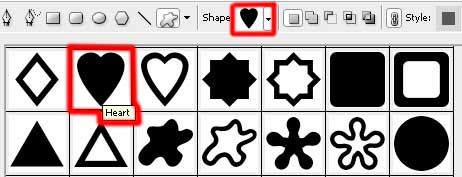
Applying the Custom Shape Tool (U), it’s possible to draw a heart that may be turned over the way shown below with the Free Transform selection. The heart’s color is #C5271C

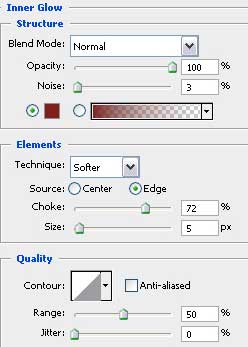
The layer’s parameters: Blending Options>Inner Glow

Now we should draw a highlight of white color, using the Pen Tool (P). The element’s shape may be corrected with Convert Point Tool.

Use the same tools for drawing one more highlight on the heart.

Each layer containing the highlights must have the same parameters, indicated next: Fill 40%

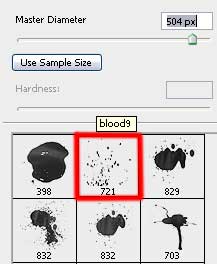
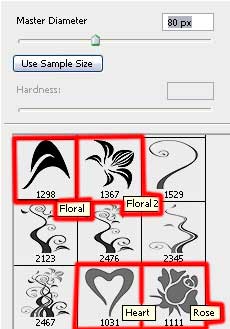
Download from Internet sets of ready to use brushes for Adobe Photoshop, named: BloodPack1__invaynestock, Vector_Brushes, Floral.
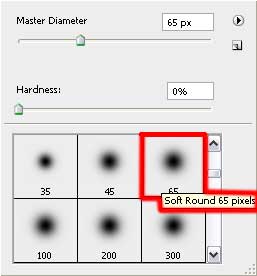
Create a new layer and use the Brush Tool (B) out of the set BloodPack1__invaynestock. The color that the brush has is #A9A8A7. Place the brush’s layer under the heart’s layer on the layers’ panel.

Create one more new layer (Create new layer) and use on it the above mentioned brush. Select after that the Free Transform option to turn over the elements, placing them the way shown next picture. The brush’s color is #DEDDDD. This layer should be situated also under the heart’s layer on the layers’ panel,

Select the same parameters from below for both layers containing the brushes. Fill 40%

Take the Pen Tool (P) of white color to draw a wing which shape also may be corrected with the Convert Point Tool. The wing’s layer should be situated under the heart’s layer too.


Make a copy of the layer containing the white wing and choose Free Transform selection to turn around the copy for placing it the same way illustrated below. The new wing’s layer is placed under the heart’s layer on the layers’ panel.

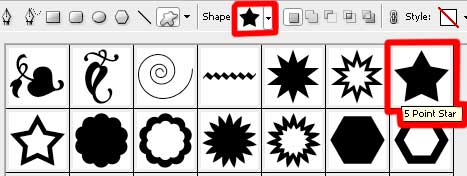
Choose one more time the Custom Shape Tool (U) to draw a small star.

The layer’s parameters: Blending Options>Inner Glow

Blending Options>Gradient Overlay
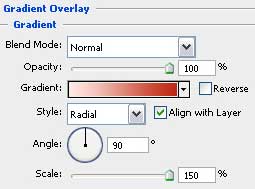
Gradient’s parameters:
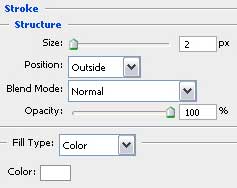
Blending Options>Stroke

Begin by representing a new file (File>New) that must have 1024x768 px and 72 dpi. Use next the Rectangle Tool (U) to draw the background of our picture we want to get finally.
Select the next demonstrated parameters by making a mouse click on the layer we work with on the layers’ panel. Fill 0%
Blending Options>Gradient Overlay
Gradient’s parameters:
Applying the Custom Shape Tool (U), it’s possible to draw a heart that may be turned over the way shown below with the Free Transform selection. The heart’s color is #C5271C
The layer’s parameters: Blending Options>Inner Glow
Now we should draw a highlight of white color, using the Pen Tool (P). The element’s shape may be corrected with Convert Point Tool.
Use the same tools for drawing one more highlight on the heart.
Each layer containing the highlights must have the same parameters, indicated next: Fill 40%
Download from Internet sets of ready to use brushes for Adobe Photoshop, named: BloodPack1__invaynestock, Vector_Brushes, Floral.
Create a new layer and use the Brush Tool (B) out of the set BloodPack1__invaynestock. The color that the brush has is #A9A8A7. Place the brush’s layer under the heart’s layer on the layers’ panel.
Create one more new layer (Create new layer) and use on it the above mentioned brush. Select after that the Free Transform option to turn over the elements, placing them the way shown next picture. The brush’s color is #DEDDDD. This layer should be situated also under the heart’s layer on the layers’ panel,
Select the same parameters from below for both layers containing the brushes. Fill 40%
Take the Pen Tool (P) of white color to draw a wing which shape also may be corrected with the Convert Point Tool. The wing’s layer should be situated under the heart’s layer too.
Make a copy of the layer containing the white wing and choose Free Transform selection to turn around the copy for placing it the same way illustrated below. The new wing’s layer is placed under the heart’s layer on the layers’ panel.
Choose one more time the Custom Shape Tool (U) to draw a small star.
The layer’s parameters: Blending Options>Inner Glow
Blending Options>Gradient Overlay
Gradient’s parameters:
Blending Options>Stroke
Make two copies of the layer containing the star and select again the Free Transform option to make the necessary changes on the copies’ sizes, placing them as below:

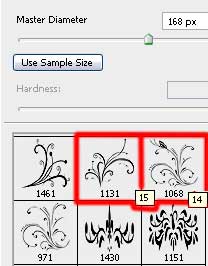
Create a new layer again (Create new layer), using this time on it the brushes out of the set Vector_Brushes. The brushes’ color is #393532. Turn around the brushes the way shown below and place the new layer under the heart’s layer on the layers’ panel.

Combine in a group all the layers containing the brushes Vector_Brushes (press Ctrl button to mark out the corresponding layers and hold on the left mouse’s button while moving the marked layers on Create a new group selection). Select the next parameters for the new group.
Blending mode-Hard Light

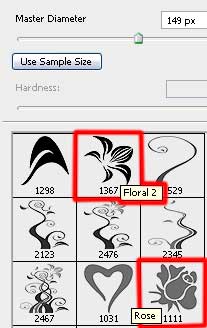
Create again a new layer (Create new layer) and use on it the mentioned above brushes. The color of the Floral brushes is #878684. Rose brushes have the color #605C5B

Combine in a group all the layers of the recently applied brushes (hold on Ctrl button for marking out the necessary layers and then keep pressed the left mouse’s button while taking the marked layers on Create a new group option). Apply the next parameter for the last created group:
Blending mode-Color Dodge

On the next layer (Create new layer) we should select the Floral brushes. Their color is white and their location may be changed with the Free Transform selection.

On the next layer (Create new layer) we’ll select the Brush Tool (B) to draw several small circles of white color, having the color #EEB7B0

Create one more new layer and select the Brush Tool (B) out of the set entitled Vector_Brushes. The brushes’ color is white and their position may be changed again with Free Transform option.

Representing the picture came to end!
โหดไหมมมมม !! เราทำได้ครึ่งเดียวเอง - -
Create a new layer again (Create new layer), using this time on it the brushes out of the set Vector_Brushes. The brushes’ color is #393532. Turn around the brushes the way shown below and place the new layer under the heart’s layer on the layers’ panel.
Combine in a group all the layers containing the brushes Vector_Brushes (press Ctrl button to mark out the corresponding layers and hold on the left mouse’s button while moving the marked layers on Create a new group selection). Select the next parameters for the new group.
Blending mode-Hard Light
Create again a new layer (Create new layer) and use on it the mentioned above brushes. The color of the Floral brushes is #878684. Rose brushes have the color #605C5B
Combine in a group all the layers of the recently applied brushes (hold on Ctrl button for marking out the necessary layers and then keep pressed the left mouse’s button while taking the marked layers on Create a new group option). Apply the next parameter for the last created group:
Blending mode-Color Dodge
On the next layer (Create new layer) we should select the Floral brushes. Their color is white and their location may be changed with the Free Transform selection.
On the next layer (Create new layer) we’ll select the Brush Tool (B) to draw several small circles of white color, having the color #EEB7B0
Create one more new layer and select the Brush Tool (B) out of the set entitled Vector_Brushes. The brushes’ color is white and their position may be changed again with Free Transform option.
Representing the picture came to end!
โหดไหมมมมม !! เราทำได้ครึ่งเดียวเอง - -
เก็บเข้าคอลเล็กชัน
ความคิดเห็น